Sewzy
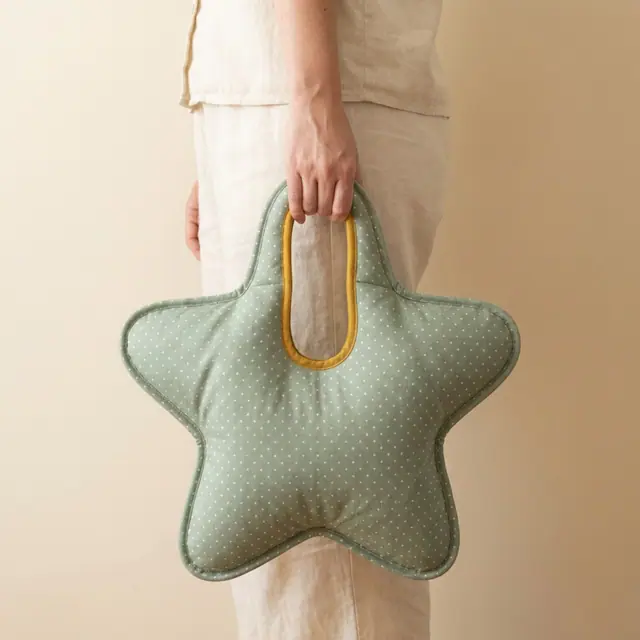
To sew a star bag, cut two star-shaped outer pieces and two lining pieces, fuse fleece to the outer, then sew the outer and the lining into two separate bags. Slide the outer inside the lining, stitch the top edge, turn the bag through a handle opening, topstitch, and bind both handle openings with bias tape. The Star Bag in the Sewzy app comes in Mini and Large sizes, is rated intermediate and takes about 2 hours.
TL;DR
- Sizes: Mini 11⅜ x 12½ in and Large 15⅞ x 17⅜ in, plus an optional gusset version for a boxier bag.
- Fabric: quilting cotton, canvas or corduroy outside, cotton lining, and fusible fleece to make it puffy.
- Seam allowance: ⅜ in is included. The handle openings have none, because their edges are bound.
- Time: about 2 hours, intermediate. Snipping the inside corners is what gives crisp star points.
- Price: Premium, in the Sewzy app.
Sew the Star Bag from this guide, step by step, in the Sewzy app
Pick your size, print it from your phone, and follow every step with a sewing coach beside you.


What size is a star bag?
| Size | Finished | Outer | Lining | Fusible fleece | Magnetic snap |
|---|---|---|---|---|---|
| Mini | 11⅜ x 12½ in | ½ yd | ¾ yd | ½ yd | 14 mm |
| Large | 15⅞ x 17⅜ in | ⅝ yd | 1 yd | ⅝ yd | 18 mm |
Mini is a small carry bag for a child or for gifts. Large is big enough to slip over your shoulder; keep heavy things low in the bag. If you have not printed a PDF pattern before, read how to print PDF sewing patterns first.
What fabric and supplies do I need?
- Outer: quilting cotton, canvas or corduroy.
- Lining: cotton.
- Fusible fleece for the puffy look, and two 1½ in squares of iron-on interfacing to reinforce the snap (see what interfacing is and how to fuse it).
- Magnetic snap: 14 mm for Mini, 18 mm for Large.
- ½ in double-fold bias tape for the handle openings.
- Thread, clips or pins, and a chopstick for poking out the tips. A walking foot and a 90/14 needle help with the thick layers.
Canvas or duck works if you choose a lighter fleece, so the inside corners still turn, and a jeans needle. With corduroy, cut every piece with the nap running the same direction. For needle choices, see the needle and thread guide.
How do I sew a star bag, step by step?
- Cut. Print your size, cut out the paper piece and tape it together. Fold the fabric with the right sides inside, place the paper's fold edge on the fold and cut, including the handle opening. Cut 2 outer and 2 lining pieces, plus the pocket panel from lining fabric.
- Fuse the fleece. Cut 2 fleece pieces along the dashed line. They are smaller than the fabric, with a larger handle hole, so the fleece stays out of the seams. Put each one glue side down on the wrong side of an outer piece and press about 10 seconds in each spot. Lift the iron between spots and do not slide it.
- Add the snap and pocket to the linings. Iron a 1½ in square of interfacing behind each snap mark, then fit one half of the magnetic snap to each lining. Fold the pocket panel on its fold line, stitch the top edge, press, and lay it on the front lining. Baste around the curves and stitch down the middle line to make two slots.
- Sew the outer bag. Put the two outer pieces right sides together and stitch ⅜ in from the edge, from one marked dot around the arms and the bottom to the other dot. Start and stop exactly on the dots and backstitch. Snip into every inside corner up to the stitches, trim the tips and turn right side out.
- Sew the lining bag the same way, dot to dot. You do not need a turning gap. Snip the corners and leave it wrong side out.
- Put the outer inside the lining. Slide the outer bag, right side out, into the lining bag, wrong side out, so the right sides face each other. Match the valley dots and the tops of the handles.
- Sew the top edge. Stitch the front outer to the front lining along the top edge, from one dot, over the handle, to the other dot. Repeat on the back. Snip the curve every ½ in and leave the handle openings raw.
- Turn it. Reach in through a handle opening, take hold of the outer bag and pull it out one tip at a time. Push the lining down inside and poke the tips out with a chopstick.
- Press and topstitch. Roll the top seam right to the edge and press with a cloth. Topstitch ¼ in from the top edge, dot to dot, on the front and the back.
- Line up the openings. Lay the bag flat and smooth the lining behind the outer so both handle openings sit exactly on top of each other. Pin, then baste ¼ in from the raw edge, front first, then back. Trim anything that peeks out.
- Bind the handle openings. Fold the start of the bias tape under ½ in. Open one fold and pin the tape around the opening on the lining side, edges together. Stitch in the fold and overlap the end by 1 in. Wrap the tape to the outer side and edgestitch it. Bind the back opening the same way.
- Finish. Close the snap, fluff the tips and check that both openings line up. A contrast bias tape around the handle gives the signature look.
How do I make the gusset version?
The gusset version gives a boxier, roomier bag. It adds three steps before you carry on with the main steps.
- Sew the 2 outer gusset halves end to end at the bottom center. Do the same with the 2 lining halves and the 2 fleece halves. Fuse the fleece to the outer strip, ⅜ in in from the edges.
- Put the strip between the two outer panels, right sides together. Match the numbered notches 1, 2 and 3 and the bottom center, then stitch each panel to one long edge of the strip, dot to dot. Snip the corners. Make the lining the same way.
- Slide the outer inside the lining and continue from step 6 above. The top edge is now front, strip end and back.
How do I get crisp star points?
- Snip every inside corner right up to the stitches. This is what lets the points turn out sharp.
- Trim the tips before turning, then use a chopstick rather than scissors to push them out.
- Stop on the dots. Start and stop exactly on the marked dots, because the handle opening stays unsewn until the binding.
- Sew the curves slowly. If curves are new to you, see how to sew a straight line and curves.
Common mistakes when sewing a star bag
- Sliding the iron over the fleece. Slides pull the fleece out of place before the glue bonds. Press, lift and move.
- Sewing past the dots. That closes the handle opening or makes the binding fight the seam.
- Skipping the snips. Unsnipped valleys pucker and the star points go round instead of sharp.
- Handle openings that do not match. Smooth the lining before you baste, so the outer and lining openings sit exactly on top of each other.
- Putting it in the dryer. Fusible fleece can bubble. Wash cold on gentle inside a pillowcase, reshape and air dry.
What should I sew next?
For other structured bags, see how to make a bucket bag (the Bucket Bag pattern), how to sew a puffer bag (the Puffer Bag pattern) and how to sew a lined tote bag. If seam allowances are new to you, read seam allowance explained, and browse the whole bag sewing patterns collection. The Star Bag is a Premium pattern in the Sewzy app, with both sizes and the gusset version.
 10 gifts to sew for teachers (desk to classroom)6 min read
 How to topstitch: a beginner's guide to straight lines6 min read
 How to sew with minky without the mess (beginner guide)7 min read