Sewzy
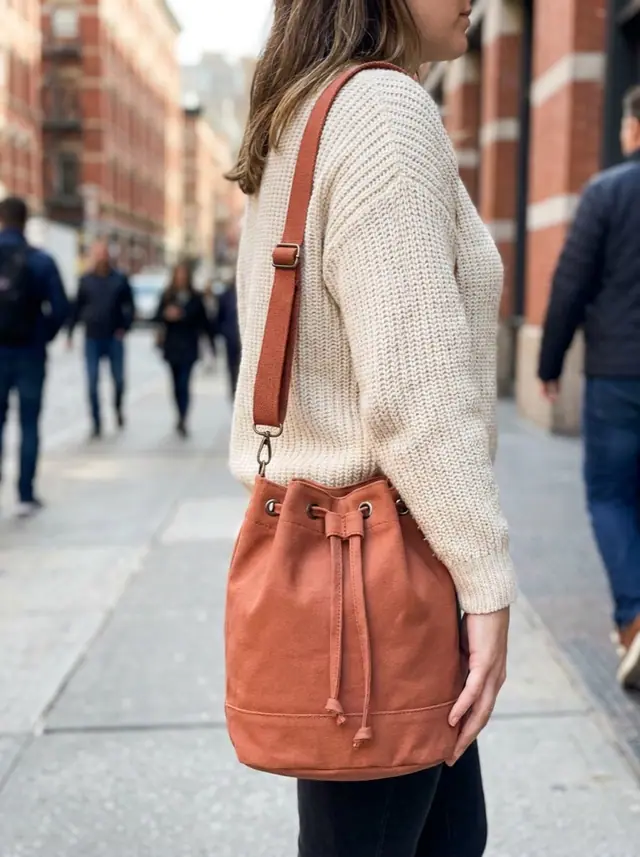
To make a bucket bag, sew a fabric tube with one side seam, ease a round base into the bottom, join the outer to a lining at the top, make two cord openings in the top channel and thread two drawstring cords through it. The Sewzy Bucket Bag takes about 120 minutes and comes in three sizes: Mini (6 in base, 7 in tall), Medium (7 in base, 9 in tall) and Large (8½ in base, 11 in tall). The seams are straight except for one gentle circle, so it suits a beginner who is ready for a lined bag.
TL;DR
- A bucket bag is a lined bag with a round base and a drawstring top. The Sewzy pattern adds two D-rings and a slider strap, so it works as a handbag or a crossbody.
- Choose the size by base and height: Mini 6 x 7 in, Medium 7 x 9 in, Large 8½ x 11 in. Every size takes ½ yd of outer fabric. The lining is ⅜ yd for Mini and Medium and ½ yd for Large.
- Make the two cord openings with grommets or with buttonholes or loop tabs, not both. The buttonhole and loop options need only your machine.
- Ease the round base into the tube one quarter at a time, matching four notches. Do not gather it.
- The Bucket Bag is a Premium pattern with 12 steps and about 120 minutes of sewing.
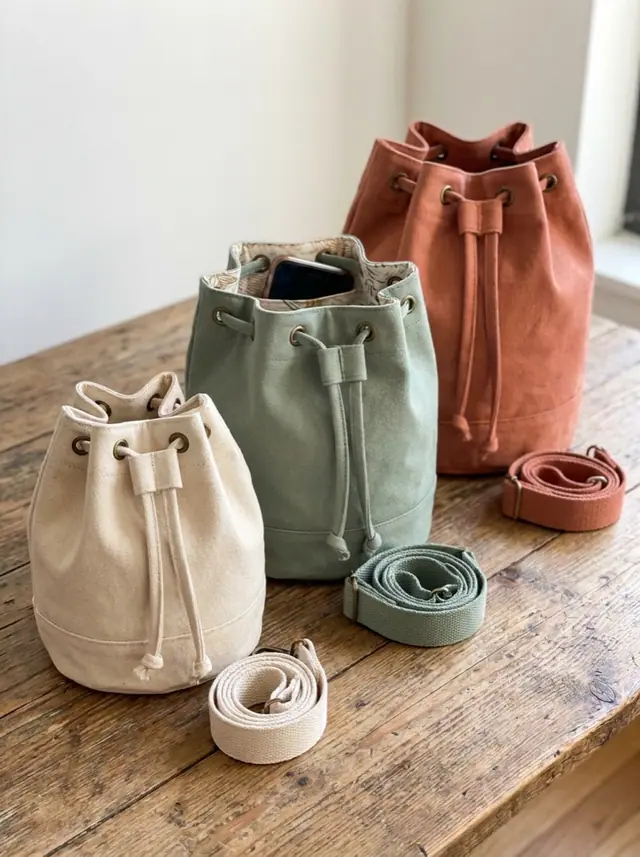
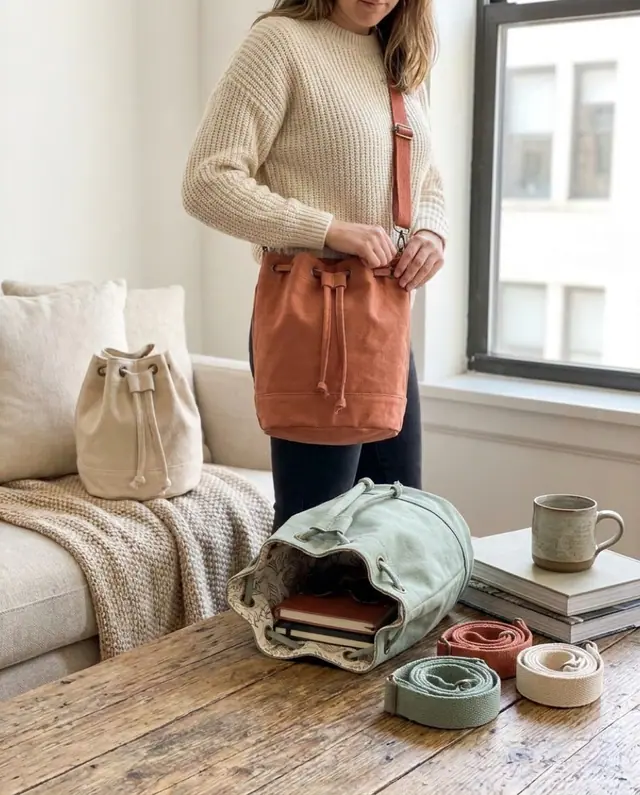
What is a bucket bag?
A bucket bag is a lined bag with a round base and straight sides, so it stands up like a bucket, and a drawstring closes the top. In the Sewzy Bucket Bag pattern the drawstring runs through a channel at the top edge. Two cords leave the channel at opposite sides of the bag, so pulling both ends cinches it shut.
The pattern teaches three skills: sewing a round base, lining a bag and making a drawstring channel. It also has an optional slip pocket on the lining and a strap that clips onto two D-rings. A slider lets you shorten the strap, so you can carry the bag on the shoulder or across the body.
What size bucket bag should I make?
Pick the size by the base and the height, then check both against the things you want to carry before you cut. The pattern includes all three sizes, and the outer fabric amount is the same for each.
| Size | Base | Height | Outer fabric | Lining fabric |
|---|---|---|---|---|
| Mini | 6 in | 7 in | ½ yd | ⅜ yd |
| Medium | 7 in | 9 in | ½ yd | ⅜ yd |
| Large | 8½ in | 11 in | ½ yd | ½ yd |
The lining is the only difference in yardage: Large needs ½ yd where Mini and Medium need ⅜ yd. The strap, the two D-ring tabs and the two cords are cut by measurement, so follow the pattern's notions list for those. The seam allowance is ⅜ in and is already included on every printed edge.
What fabric and supplies do I need for a bucket bag?
Use cotton canvas, duck or denim for the outer and the strap. A mid to heavy weight holds the round shape. The lining can be quilting cotton or poplin. The optional slip pocket comes from the lining fabric or a contrast scrap. If you are unsure which cotton to choose, the guide to fabric for beginner sewing compares the common weights.
You also need:
- 2 D-rings (1 in) and 1 slider (1 in) for the strap
- 2 grommets (½ in), or 2 buttonholes or loop tabs, for the cord openings
- 2 lengths of round cord, with the width and length given for each size in the pattern, plus 2 cord stops
- Fusible interfacing scraps for behind each cord opening
- Matching thread. For canvas, a 90/14 denim needle is a good choice; the needle and thread guide explains the sizes.
- Optional: template plastic or heavy fusible stabilizer cut as a round base insert
Should I use grommets or buttonholes for the cord openings?
Choose one method before you start, because the pattern treats them as alternatives. Both go through the outer and the lining together, at the two cord opening marks you transfer in step 2. Grommets give a finished metal ring. Buttonholes and loops use only the sewing machine.
| Grommets | Buttonhole or loop tab | |
|---|---|---|
| What you need | 2 grommets of ½ in and the tool to set them | Just your machine and a seam ripper |
| What you do | Fuse a small interfacing square behind each mark, then set a grommet through both layers, centered in the channel band | Sew a ¾ in horizontal buttonhole at each mark and open it, or skip the opening and stitch a small loop tab over each mark on the outside for the cord to pass through |
| Choose it if | You own grommet pliers or a setting tool and like the look | You have no grommets on hand |
If you go with buttonholes, how to make a buttonhole covers the stitch settings. Whichever you pick, the interfacing behind the mark stops the fabric from stretching or tearing where the cord rubs.
How do I make a bucket bag, step by step?
These are the 12 steps of the Bucket Bag pattern in short. Steps 9 and 10 are alternatives, so you do one of them. If you have not printed a PDF pattern before, read how to print PDF sewing patterns first, and check the 2 in test square on the first page.
- Cut. Print your size, tape the tiles and cut one body from the outer fabric and one from the lining. Cut one base from each fabric on the fold. Cut the optional pocket, then the strap, the two D-ring tabs and the two cords by measurement.
- Mark. On both body pieces transfer the four quarter notches along the bottom edge, the channel stitch line, the two cord opening marks and the two strap tab marks. On the lining body also mark the turning gap. On both bases mark the four quarter notches round the circle.
- Add the optional slip pocket. Hem the top of the pocket, press the sides and bottom under ⅜ in, center it on the lining body and edgestitch the sides and bottom, leaving the top open.
- Make the D-ring tabs. Fold each strip lengthwise into a firm strap ⅜ in wide and edgestitch it. Loop each one through a D-ring with the raw ends together and baste them closed.
- Sew the side seam. With the outer body right sides together, stitch the one seam that turns the flat panel into a tube. Below the channel line it runs to the bottom edge. Above the line it stops at the first cord opening, which leaves a gap for the cord to exit. Do the same on the lining, but leave the marked gap open near the bottom for turning.
- Sew the base. Pin the outer base to the bottom of the outer tube, right sides together, matching all four notches, and stitch ⅜ in from the edge. Repeat for the lining. Turn the outer right side out and leave the lining wrong side out.
- Place the strap tabs. Pin a D-ring tab at each strap mark on the outer, raw ends level with the top edge and the rings hanging down inside the bag, not twisted. Baste them.
- Join outer and lining. Slip the outer bag into the lining with right sides together and the side seams matching, tabs tucked between the layers. Stitch round the top, going back and forth over each tab. Turn the bag right side out through the lining gap and stitch the gap closed.
- Cord openings, option A: grommets. Fuse an interfacing square behind each opening mark, then set a ½ in grommet through both layers at each mark.
- Cord openings, option B: buttonhole or loop. Sew a ¾ in buttonhole through both layers at each mark and cut it open, or stitch a fabric loop tab over each mark instead.
- Topstitch the channel. Push the lining into the bag and press the top edge. Topstitch along the channel stitch line all the way round, but pivot around each cord opening instead of sewing across it, so the cord can pass.
- Thread the cords and add the strap. Run one cord all the way round the channel and back out of the first opening, and the second cord the same way through the second opening. Knot the ends or add a cord stop, then pull both cords to close the bag. Thread the strap through the slider and both D-rings so its length can be adjusted, and clip or loop it onto the rings.
The Bucket Bag pattern page links short how-to videos on sewing a circle bottom and setting a grommet, which help with steps 6 and 9.
How do I sew a round base without puckers?
Match the four quarter notches on the base circle to the four notches on the bottom edge of the tube, then ease the small amount of extra fabric evenly between them. Do not gather. The pattern's advice is to work one quarter at a time, which keeps the base flat. If a pucker still forms, unpick that quarter and pin it again.
A round insert keeps the finished bag open. The pattern suggests template plastic or a heavy fusible stabilizer cut to the base circle and dropped into the bottom. It is optional, and it comes out before washing.
What can go wrong, and how do I fix it?
| Problem | Likely cause | Fix |
|---|---|---|
| Puckers on the base | The circle was not matched to the notches | Unpick, pin at all four notches and sew a quarter at a time |
| The cord stretches or tears the opening | No interfacing behind the mark | Fuse an interfacing square behind each opening before you set the grommet or sew the buttonhole |
| The cord will not pass | The channel stitching crosses the opening | Unpick the stitches across the opening and pivot around it instead |
| The bag slumps | Light fabric and no insert | Use canvas, duck or denim and add a round insert in the base |
| The strap hangs crooked | A D-ring tab was twisted when you basted it | Check the tabs hang straight before you join outer and lining |
How do I wash a bucket bag?
The pattern's care note is to machine wash cold on a gentle cycle, reshape the bag while it is damp and let it air dry. Press with steam on the cotton setting. Take the base insert out first.
What should I sew after a bucket bag?
For a simpler drawstring project, the free Drawstring Bag takes about 30 minutes and uses a casing at the top instead of a lining. The matching guide is how to sew a drawstring bag. For a soft shoulder bag with a longer strap, try how to sew a hobo bag. The bag sewing patterns page lists all the bags in the app.
Make it with Sewzy
The Bucket Bag is a pattern in Sewzy, an iPhone app. It is a Premium pattern. Choose Mini, Medium or Large, print the letter-size PDF at home or take the A0 file to a copy shop, then follow the step-by-step guide, which splits the grommet and buttonhole choice into its two options. Some patterns are free, including the Drawstring Bag, and you can browse them on the free sewing patterns page. Read more about the Sewzy sewing app, or get Sewzy on the App Store.
 Winter sewing projects: 14 cozy things to make6 min read
 How to sew fabric Christmas ornaments (4 shapes)6 min read
 Gifts to sew for men: 10 things he will actually use6 min read
 How to sew a baby bib (free pattern)5 min read