Sewzy
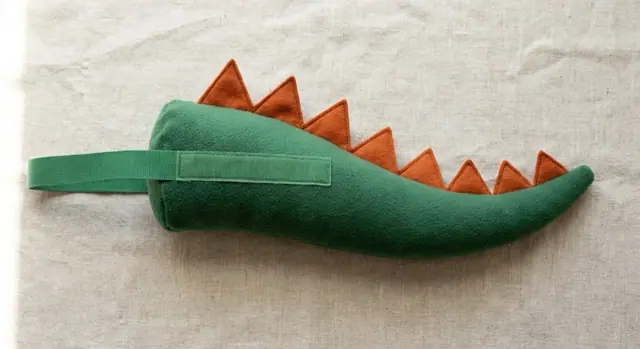
To sew a dinosaur tail, make three spike shapes in a contrast fabric, baste them along the top edge of the tail, sew the tail closed, attach a hook-and-loop belt to a base piece, join the base to the tail, then turn, stuff and close. The Dinosaur Tail pattern in the Sewzy app comes in three kids sizes (waist 18 to 30 in), is rated intermediate and takes about 2 hours.
TL;DR
- Sizes: Small (waist 18 to 22 in), Medium (22 to 26 in), Large (26 to 30 in).
- Level and time: intermediate, about 2 hours in 12 steps.
- Key skills: making spikes, placing them in a seam, sewing a belt with hook-and-loop tape.
- Fabric: Toddler: ½ yd main + ¼ yd contrast. Kid: ⅔ yd + ¼ yd. Big Kid: ¾ yd + ⅓ yd (45 in wide). Plus ½ to 1 bag of fiberfill.
- Price: Premium, in the Sewzy app.
Sew the Dinosaur Tail from this guide, step by step, in the Sewzy app
Pick your size, print it from your phone, and follow every step with a sewing coach beside you.


Why sew a dinosaur tail?
A wearable dinosaur tail is one of those gifts kids put on immediately and refuse to take off. It works for dress-up, Halloween, birthday parties and everyday pretend play. Unlike a full costume, a tail is quick to sew, easy to put on (the hook-and-loop belt adjusts in seconds) and pairs with clothes the child already owns. A green T-shirt and this tail and you have a dinosaur.
It is also a great scrap project. The main tail needs under a yard of fabric, and the spikes use scraps or a fat quarter of contrast. If you have leftover fleece from a superhero cape, this is a good way to use it.
Which size should you make?
| Size | Waist | Fit |
|---|---|---|
| Small | 18 to 22 in | Toddler |
| Medium | 22 to 26 in | Kid |
| Large | 26 to 30 in | Big kid |
Measure the child's waist and pick the size that includes their measurement. The hook-and-loop belt gives a little room for adjustment, so if a child is between sizes, go with the larger one.
What fabric and supplies do you need?
- Main fabric: fleece, minky, felt-backed velvet, corduroy or quilting cotton. Fleece is the top choice because it does not fray and the tail drapes nicely.
- Contrast for spikes: a different color of the same type, or felt. Felt spikes need no turning because the edges stay clean.
- Amounts (45 in wide): Toddler: ½ yd main + ¼ yd contrast. Kid: ⅔ yd + ¼ yd. Big Kid: ¾ yd + ⅓ yd.
- Stuffing: polyester fiberfill, about ½ to 1 bag depending on the size.
- Notions: 3 in of 1 in wide hook-and-loop tape, thread, clips, a chopstick for stuffing the tail tip.
The seam allowance is ⅜ in and is already included in the pattern pieces.
How to sew the dinosaur tail, step by step
The pattern has 12 steps. Here is the full sequence.
- Measure and choose. Measure the child's waist and pick Small, Medium or Large.
- Print and cut. Print the pattern at 100%, verify the test square, then cut the pieces: tail, base and spikes A, B and C. Cut the spikes from the contrast fabric.
- Mark the pieces. Transfer the spike placement marks to one tail piece. They show exactly where each spike sits along the top edge.
- Make the spikes. Sew each spike pair right sides together along the two angled edges, leave the base open, clip the point, turn and press. There are three spike shapes, A, B and C, so the line of spikes steps in size along the tail.
- Spikes on the tail. Pin or clip the spikes along the top edge of one tail piece, raw edges aligned, following the placement marks so each spike sits where the pattern shows. Baste in place.
- Sew the tail. Place the second tail piece on top, right sides together, sandwiching the spikes. Sew around the tail, leaving the wide end open.
- Make the belt. Fold the belt strip in half lengthwise, sew the long edge and one short end, turn and press.
- Hook and loop. Sew the hook side to the belt tip and the loop side to the belt near the base piece, so the belt wraps around the waist and fastens.
- Belt onto the base. Sew the belt ends to the base piece at the marks.
- Base into the tail. Pin the base into the open end of the tail, right sides together, matching the marks. Sew around, leaving a gap for turning.
- Turn, stuff, close. Turn the tail right side out through the gap. Use a chopstick to push stuffing into the tip first, then fill the rest. Ladder-stitch the gap closed.
- Put it on and check. Wrap the belt around the child's waist, fasten the hook-and-loop tape and make sure the tail hangs where you want it.
How do you place the spikes so they look even?
Spike placement is where most of the time goes, so do it calmly. Mark the placement points on the tail in step 3, then lay out all the spikes along the top edge before you pin anything. Step back and look at the row. If it looks lopsided on the table, it will look lopsided on the child.
Pin each spike with its raw edge lined up with the raw edge of the tail and its point facing into the tail. Clips are kinder to fleece and minky than pins. Then baste with a long stitch close to the edge, which also gives you a chance to check that every spike is still where you want it before the final seam.
Which fabrics make the best tail?
Fleece is forgiving: it does not fray, it is warm and the spikes keep their shape. Minky feels lovely but is slippery, so use plenty of clips and sew slowly. Quilting cotton gives a crisp tail with bright prints, but it needs more careful clipping and turning. Felt-backed velvet and corduroy look rich, though they are heavier. If you choose a different fabric for the spikes, felt is the easiest because it needs no turning.
Wash and dry washable fabrics before cutting, especially cotton, so the finished tail does not shrink after the first wash.
Common mistakes
- Spikes pointing the wrong way. When you sandwich the spikes between the tail layers, the points must face inward (toward the center of the tail), not outward. When you turn the tail, they will pop up correctly.
- Understuffing the tip. The tail tip is narrow and hard to reach. Use small pinches of fiberfill and push each one in with a chopstick before adding the next.
- Skipping the baste. Basting the spikes first keeps them from shifting when you sew the main seam. It is worth the extra two minutes.
- Hook-and-loop tape backwards. The hook (scratchy) side goes on the belt tip that wraps over. The loop (soft) side goes underneath, so the soft side sits against the child's clothes.
What to make next
A dinosaur tail pairs well with a superhero cape for double dress-up power. For more handmade gift ideas, see gifts to sew for kids sorted by age and time. If you want to try a stuffed toy next, the beginner plushie guide walks through the basics, or browse all the options in the plushie sewing patterns hub.
 10 gifts to sew for teachers (desk to classroom)6 min read
 How to topstitch: a beginner's guide to straight lines6 min read
 How to sew with minky without the mess (beginner guide)7 min read