Sewzy
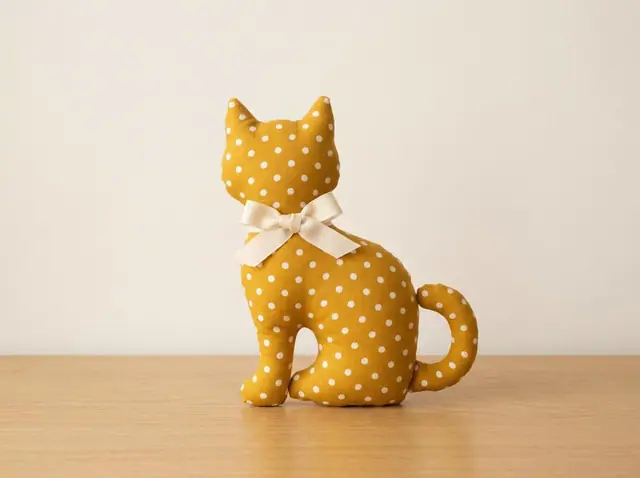
To make a memory cat, you turn a favorite garment into flat panels, back any stretchy fabric with interfacing, and sew a head with two standing ears, a body, four limbs and a curved tail. The Memory Cat pattern in the Sewzy app comes in 10 sizes from 6 to 24 inches, and a first cat takes about 4 hours.
TL;DR
- The Memory Cat is in the Sewzy app (it is not one of the free patterns), rated intermediate, about 240 minutes for a first cat.
- 10 sizes, 6 to 24 inches finished height. A baby onesie makes a 6 or 8 inch cat, and one adult shirt covers 12 to 16 inches.
- What makes it a cat: pointed ears that stand up with a lined inner ear, a pink nose, a Y mouth, whiskers and a stuffed tail.
- Seam allowance is ¼ inch (6 mm), already included in the pieces.
- For a baby, embroider the eyes and skip the pellets and the hard joints.
Sew the Memory Cat from this guide, step by step, in the Sewzy app
Pick your size, print it from your phone, and follow every step with a sewing coach beside you.


What is a memory cat?
A memory cat is a soft toy cat cut from clothing someone wore, such as a flannel shirt, a nightgown, a baby outfit or a blanket. It keeps that person's colors and fabric close, so it works as a keepsake, a gift or a way to remember a pet. This guide covers what makes the cat different: the ears, face and tail. For choosing and preparing clothes for any memory toy, read how to make memory bears from clothing. If you want a dog instead, see the memory dog pattern guide.
Which clothes make the best memory cat?
Start with a garment that was worn a lot. A woven cotton shirt or flannel is easiest for a first cat because it holds its shape. T-shirts, jersey and thin cottons are fine once you fuse lightweight woven interfacing to them, so the head does not distort. The pattern lists shirts, dresses, sweatshirts, flannel, denim, fleece, baby clothes and blankets, and it suggests a second garment for the foot pads and the inner ears. A shirt cuff or a floral scrap makes a pretty inner ear. Not sure about interfacing? Read what is interfacing.
How big is a memory cat, and how much fabric does it need?
Sizes are the finished height. This is what each size is made from, and the fabric amount.
| Finished height | Made from | Fabric |
|---|---|---|
| 6 inches | Baby onesie or sleeve | ⅛ yard |
| 8 inches | Baby onesie | ⅛ yard |
| 10 inches | Child tee | ¼ yard |
| 12 inches | Adult tee or shirt | ⅓ yard |
| 14 inches | Adult shirt | ½ yard |
| 16 inches | Adult shirt | ½ yard |
| 18 inches | Adult shirt or blouse | ⅔ yard |
| 20 inches | 2 shirts or a dress | ¾ yard |
| 22 inches | 2 shirts or a dress | 1 yard |
| 24 inches | Flannel or a blanket | 1¼ yards |
For a first cat, we suggest 12 or 14 inches. One adult shirt is enough, and the pieces are easy to handle.
What else do I need?
- Eyes: safety eyes (6 mm for the 6 to 10 inch sizes, 9 to 12 mm above), or embroidered eyes.
- Face: pink perle cotton for the nose and black embroidery floss for the whiskers.
- Stuffing: fiberfill, plus optional poly pellets for a floppy cat.
- Joints (optional): 4 plastic doll joints, or 4 shank buttons with strong thread.
- Tools: a doll needle and ladder-stitch thread.
How do I sew a memory cat, step by step?
The pattern has seven steps. Here they are in plain words.
- Prepare the garment. Wash and press it, then open it along its seams into flat panels. Fuse interfacing to anything stretchy. Plan where a pocket, buttons or a logo will land. The tummy and the foot pads are popular spots.
- Cut. Print only your size. Cut 2 head sides (mirrored), 1 head gusset, 2 body fronts, 2 body backs, 4 arms, 4 legs, 2 foot pads, 4 ears (2 outer and 2 inner) and 2 tail pieces. Copy every notch, joint dot, eye mark, gap and opening line.
- Head. Put the two head sides together and stitch the chin seam from the nose tip down to the neck. Then sew the short snout seam from the nose tip up to the bridge notch. Pin the gusset in from the bridge notch, over the crown, to the nape, and stitch both sides. Clip the curves and turn the head right side out.
- Face and ears. Set the safety eyes at the marks, or embroider them later. Stuff the head firmly, nose first, then gather the neck edge and knot it. Make each ear from one outer and one inner piece, turn it flat, pleat the base a little and ladder-stitch it between its notches so it stands up. Embroider a pink nose, a Y mouth and three whiskers on each side.
- Body. Join the body fronts at the center front. Join the body backs at the center back, leaving the marked opening. Place the front on the back with right sides together, stitch all round from neck to neck and turn through the opening.
- Arms and legs. Sew each pair, leaving the gap open. On the legs, stitch the foot pad into the bottom between the notches before turning. Turn, stuff and close the gaps with ladder stitch, or leave the tops open if you use plastic doll joints.
- Join and finish. Stuff the body and close the opening. Ladder-stitch the head to the neck, then attach the limbs at the joint dots. Make the tail last: sew the two pieces, turn, stuff lightly and ladder-stitch it to the back seam just above the base.
New to hand closing? Our guide on how to sew a stuffed animal by hand explains the stitch.
How do I get the ears, whiskers and tail right?
Ears. These are what make it a cat. Unlike a floppy dog ear, the cat ear stands up: a small pleat at the base and stitches along the notches hold it upright. Cut the inner ear from a shirt cuff or a floral scrap to make it stand out.
Face. Stitch the pink nose first, then the Y mouth under it, then three black whiskers on each side. Pull the floss gently so the face does not pucker.
Tail. Stuff it lightly so it can curve. A tail packed hard stands out like a stick.
Foot pads. Use a second garment or a cuff for contrast.
Which joint option should I choose?
The pattern gives you three. Plastic doll joints let the arms and legs turn. Shank buttons with strong thread, pulled through the body, make a soft thread joint. Or you can simply ladder-stitch the limbs on, which is the safest for a baby because there is nothing hard inside.
Common mistakes
- Skipping interfacing on knits. Jersey stretches under the needle and the head turns out lopsided.
- Cutting before planning. Decide where the pocket, logo or buttons will sit first.
- Soft, drooping ears. Pleat the base and stitch the ear between its notches so it stands.
- Overstuffing the tail. It should curve.
- Skipping the clipping. Clip the head curves before turning, or the snout will pucker.
- Hard trims on a baby toy. Embroider the eyes, skip the pellets and use ladder stitch instead of plastic joints.
How do I care for it, and what can I add?
The pattern says to spot clean, or hand wash cold if all the fabrics are washable, and air dry. Some of the pattern's tips make nice touches: write the person's name and dates on twill tape and stitch it into the back seam, use the shirt cuff for a foot pad or the pocket for the tummy, and tie a ribbon at the neck on a gift for an older child or adult. Leave the ribbon off a toy for a baby or toddler. A 6 inch mini cat from the offcuts makes a keychain.
More memory patterns
The same method works for the Memory Bunny and the Memory Elephant. Browse them all in the memory animal patterns collection. If you have never sewn a stuffed toy, how to sew a plushie is a good place to start.
 Baby's first Christmas gifts to sew: 7 handmade ideas7 min read
 How to understitch: keep facings and linings flat7 min read
 Secret santa gifts to sew: 8 ideas in 10 to 60 minutes6 min read