Sewzy
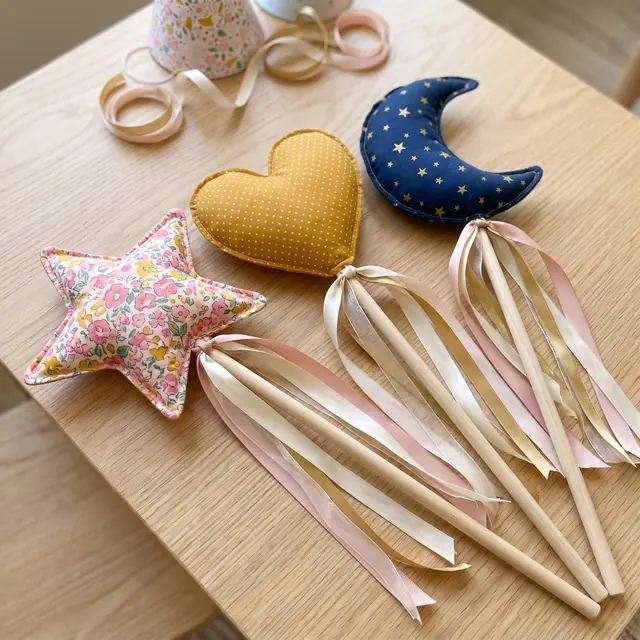
To sew a magic wand, sew two fabric stars (or hearts or moons) together, clip the curves, turn and stuff the shape firmly, glue a sanded wooden dowel into it, gather the opening tight around the dowel and tie on ribbon streamers. With the Puffy Wand Trio it takes about 30 minutes, and one fat quarter makes all three shapes.
Get the pattern: Puffy Wand Trio sewing pattern, with every size and a step-by-step guide.
TL;DR
- Pattern: the Puffy Wand Trio in the Sewzy app, beginner, about 30 minutes.
- Shapes: star, heart and moon. Sizes: Small (4½ in across) and Large (6½ in across).
- Fabric: quilting cotton or cotton lawn with a tight weave and no stretch. One fat quarter makes all 3 Large shapes.
- Dowel: ¼ x 10 in for Small, ⅜ x 12 in for Large, hardwood, both ends sanded.
- Seam allowance: ¼ in, included. Use a short stitch, about 2 mm.
- Stuff firmly and let the glue dry overnight before play.
Sew the Puffy Wand Trio from this guide, step by step, in the Sewzy app
Pick your size, print it from your phone, and follow every step with a sewing coach beside you.

What do I need to sew a magic wand?
| Item | Small | Large |
|---|---|---|
| Finished shape | 4½ in across | 6½ in across |
| Fabric | 1 fat quarter | 1 fat quarter |
| Hardwood dowel | ¼ x 10 in | ⅜ x 12 in |
| Ribbons | 6 satin or organza ribbons, ¼ to ⅜ in wide, 18 in each | |
| Also | Fiberfill, fabric glue, sandpaper, hand needle and strong thread | |
For Large, fold the fat quarter to 9 x 22 in, right sides together, and cut all 3 shapes from it. Each cut gives a matching pair. For Small, fold it to 18 x 11 in and cut all 3 shapes twice. With a directional print, keep the print upright on the grainline.
How do you sew a magic wand, step by step?
- Print and cut. Print the first page at 100% and check the 2 in test square. Fold the cotton right sides together, pin the paper piece and cut through both layers: 2 of each shape. Snip the two gap notches, no deeper than ⅛ in.
- Sew all around. Keep the pair right sides together. Set a short stitch, about 2 mm, and sew ¼ in from the edge, from one gap notch all the way around to the other. Backstitch at both ends. Go slowly around the star tips and moon horns, turning the fabric a little every few stitches.
- Clip and trim. Clip into the heart V and the 4 inner star corners to within 1/16 in of the stitching. Clip the inner curve of the moon every ½ in. Notch the outer curves and rounded tips every ½ in, ⅛ in from the stitching. Leave the gap allowance unclipped.
- Turn and press. Turn right side out through the gap. Push the tips and horns out from inside with a chopstick, gently, because the seam is only ¼ in. Roll the seam to the edge and press the gap allowance ¼ in to the inside.
- Stuff the top two-thirds. Use small pieces of fiberfill, tips and horns first, and pack firmly until the top two-thirds is plump and smooth. Leave the bottom third loosely filled so the dowel can go in.
- Prepare the dowel. Cut it to length, sand both ends smooth and slightly round and wipe off the dust. Paint or stain it now if you like, and let it dry. Dip the top 1 in in fabric glue.
- Push the dowel in. Push the glued end up through the gap into the middle of the stuffing: 1½ in for Small, 2 in for Large. For the moon, go 1 in (Small) or 1¾ in (Large) into the thickest part of the lower curve. Tuck more stuffing around it until the dowel stands straight and the shape is firm right down to the gap.
- Gather the gap. With doubled thread, sew a running stitch all the way around the opening, ⅛ in from the folded edge. Pull it tight around the dowel, wrap the thread around 3 or 4 times, stitch through the fabric and knot. Add a dab of glue under the gather.
- Tie the ribbons. Lay 6 ribbons together and fold the bundle in half around the dowel, right under the gather. Tie a tight double knot and dab it with glue. That gives 12 streamers. Trim the ends on the diagonal or in a V, and seal satin ends with fray stopper.
- Optional wrap. Hide the gather with 12 to 18 in of ¼ in ribbon or washi tape wrapped around the join and 1 in down the dowel. Glue the end.
Why do I have to clip the curves on a star wand?
A star has sharp inner corners and the moon has a deep inner curve. If you turn them without clipping, the seam allowance pulls and the shape puckers. Clipping into inner corners and notching outer curves lets the fabric lie flat once it is turned. Our guide to how to clip and notch curves explains the difference.
Is a fabric magic wand safe for young kids?
The dowel is wood, so sand both ends well and supervise play, especially with toddlers. Let the glue dry overnight before the wand is used, and give it to children 3 and older. The pattern suggests a small bell inside the stuffing for a jingle, but only for children 3 and older, because a bell is a small part.
Common mistakes
- Using stretchy fabric. Knits stretch out of shape when stuffed. Use tightly woven quilting cotton or cotton lawn.
- Stitching too long. A long stitch gaps at the star tips. Keep it at about 2 mm.
- Clipping through the stitching. Stop just short of the seam line, or the corner will open when you turn it.
- Stuffing too softly. A soft shape wobbles on the dowel. Pack small pieces in firmly.
- Skipping the sanding. Rough dowel ends can splinter. Sand both ends.
Tips for party favors and gift sets
- Cut 10 pairs at once for a party, sew them in a chain, then stuff and finish them together.
- Metallic or glitter cotton makes the star shine. Use a new 80/12 needle.
- Mix ribbon colors to match the party. Three colors in two lengths looks fullest.
- Pair a Large wand with Small ones: one for the birthday child and Small wands as favors.
A wand goes well with dress-up gifts. Add quilted fairy wings, a birthday crown or a wizard hat. For more ideas, see gifts to sew for kids and the costume sewing patterns.
 Baby's first Christmas gifts to sew: 7 handmade ideas7 min read
 How to understitch: keep facings and linings flat7 min read
 Secret santa gifts to sew: 8 ideas in 10 to 60 minutes6 min read